• Skip to content
  • Skip to primary sidebar

Header Right

  • Home
  • About
  • Contact

Quickbooks

3 Ways to Receive Payments in QuickBooks Online

October 17, 2025 by admin

Subscription Billing on Laptop, Automate Recurring Payments for Business Success, Vector Flat IllustrationGot customer payments coming in? QuickBooks Online has multiple ways to accept and record them.

One of the biggest challenges small businesses face is managing a steady cash flow. Keeping income ahead of expenses is a constant balancing act. QuickBooks Online can help. With easy-to-use forms and a convenient mobile app, it helps you track and deposit incoming payments with ease.

Do you ever receive instant payments for certain products or services? Ever need to record a sale on the go—both for your records and your customer’s? Or maybe you send out invoices and want to ensure payments are accurately logged once they come in. QuickBooks Online has you covered in all these scenarios. Plus, it offers automation tools that speed up the payment process—so you can get paid faster and focus on growing your business.

Let Customers Pay Online

If your business sends invoices for products or services, QuickBooks Online makes it easy to record customer payments. While you can manually enter payments, there’s a faster, more efficient option: QuickBooks Payments. This built-in merchant service lets you accept credit card and bank payments electronically—helping you get paid quicker and streamlining your cash flow.

Once QuickBooks Payments is set up in QuickBooks Online (contact us if you need help), your invoices will include integrated payment options for credit cards and electronic checks. Each invoice will feature a payment button, allowing customers to easily enter their payment information. You’ll be able to track when an invoice is viewed, paid, and deposited. Simply open your list of invoices and click on one to view its details. A timeline panel will slide out from the right side, showing the invoice’s history and status. Plus, you can opt to receive notifications for invoice activity.

If you prefer to record payments manually, find the unpaid invoice in your list and click the Receive Payment link at the end of the row. This opens the Receive Payment screen, where you can fill in any missing details and save. You can also find the same link on the invoice screen itself or from the Invoices page (SalesInvoices).

You can receive payments manually in QuickBooks Online from an invoice itself or from the Invoices page.

There’s no cost for setting up a pay-as-you-go account in QuickBooks Payments. There are only per-transaction fees:

●     ACH bank payments are 1%.

●     It’s 3.5% if the payment comes in through an invoice (Apple Pay, Google Pay, credit cards, etc.) or if the payments are keyed in.

●     If you swipe a card, you’ll pay 2.4%

There’s also a $0.30 fee per transaction. Transaction fees are slightly lower if you pay $20 per month. Payments that come in before 3 p.m. PT should be in your account the next business day.

Accepting Payments Through GoPayment

To take payments while you’re on the road, you’ll need a free mobile card reader from Intuit that connects to your smartphone. It supports tap, chip, and digital wallet payments. You can also manually enter card details (see above rates). To process transactions, you’ll need to download the GoPayment app, available for iOS and Android. The app lets you add product names, prices, and images to make checkout faster and easier. Multiple layers of security are in place to help protect your data during mobile transactions.

Receiving Instant Payments

Sometimes, you’ll receive payment right after delivering a product or service. In these cases, QuickBooks Online allows you to create and provide a sales receipt on the spot. Just click +New in the upper left corner, then select Sales Receipt in the Customers section. The form that opens will look similar to an invoice or estimate. Choose the customer in the upper left corner, and fill out the remaining details as you normally would. When you’re finished, click Save and send to email the receipt. You’ll have the option to preview it before sending and to print it.

The Undeposited Funds Account

The Undeposited Funds account in the QuickBooks Online Chart of Accounts

If your customer paid you on the spot with a credit card, that payment would be processed in your QuickBooks Payments merchant center. But what about a physical check? QuickBooks Online defaults to the Undeposited Funds account for sales transactions. You can change this, but we don’t recommend it. This account temporarily holds payments—typically cash and checks—that haven’t yet been deposited into your bank.

It’s a good idea to review this account regularly to ensure you’re not leaving funds languishing. Hover your mouse over the Transactions link in the toolbar and click Chart of Accounts. Scroll down until you find it, as pictured above. To combine the transactions in the Undeposited Funds account to make a bank deposit, click +New in the upper left corner and then click Bank deposit under Other. Make sure the Account in the upper left corner is set to the account where you want to deposit the funds. Click the box in front of each check you want to deposit (or Select all), then Save.

To see your deposit information, click Reports in the toolbar, then  click Deposit Detail under Sales and Customers. You’ll have to list the deposits individually on your physical deposit slip. Make sure that the slip matches what you see in QuickBooks Online.

If you need help or have questions, feel free to contact us to schedule a consultation. While the process of receiving payments isn’t overly complicated, it’s essential to ensure every payment is recorded accurately and deposited correctly into your bank accounts.

Filed Under: Quickbooks

Tired of Typing? Use Recurring Transactions In QuickBooks Online

July 17, 2025 by admin

Retro collage. Human hands and laptop. IT work concept. Vector illustrationQuickBooks Online is good at saving you time and keystrokes. Here’s another way it helps avoid duplicate data entry.

Accounting is a repetitive process. As you prepare invoices and receipts and bills, and other sales and purchase forms, you undoubtedly grow weary of typing the same information over and over. Customer and vendor names, addresses, product and service descriptions – you practically memorize these details if you have to enter them frequently.

QuickBooks Online does that memorization for you. Once you’ve entered a detail like a customer’s shipping address or the cost of an item, you never have to supply it again. You only have to select data from lists when you’re creating a purchase order, for example.

But the site goes further. If you have to enter transactions on a regular basis that are identical or nearly identical, QuickBooks Online allows you to save them as recurring templates. When it’s time for them to go out, it gives you options for dispatching them depending on the need for any tweaking. Here’s how it works.

How Do You Make Transactions Recur?

The process is very simple. You start by creating a transaction that you’d like to repeat at intervals you specify. For example, you might send monthly invoices to some customers for lawn services. Enter the invoice details like you normally would, selecting a customer and the item or service descriptions and any other information that needs to be included.

When you’re done, click the Manage icon in the upper right, scroll down in the panel that opens on the right, and click Scheduling, then toggle on the button next to Make invoice recurring. In the Template name field, give it a descriptive name that you’ll associate with the invoice. Then click the down arrow in the field under Type.

QuickBooks Online gives you three options for managing your recurring transactions.

There are three ways you can ensure that the invoice goes out at its specified interval. They are:

● Scheduled. If you select this, your transaction will go out as scheduled with no intervention from you. Only the date will change. We urge caution with this one. Be sure you won’t want to change anything.
● Reminder. QuickBooks Online will send you a reminder ahead of the scheduled date. You can specify how many days ahead you should receive it. Then it’s up to you to make any necessary changes and send it out.
● Unscheduled. QuickBooks Online will do nothing except save your template. You can modify and use this at any time that’s appropriate.

Deal with the other Template options and scroll down to set up intervals and starting/ending dates if necessary. If you choose Unscheduled, you can save the template. For Reminder and Scheduled, though, be sure to complete the fields at the bottom of the pane before saving.

If you’re creating a Scheduled or Reminder invoice template, you’ll need to complete the fields at the bottom of the Recurring settings pane.

NOTE: These instructions are based on QuickBooks Online’s new invoice format. It’s possible that your account is still using the old format. If that’s the case, or if you’re creating another type of transaction that will recur (like a bill) you will see a link at the bottom of the form that says Make recurring. Your other options will remain the same.

How Do You Use Recurring Transactions?

When you want to modify or use a recurring transaction, click the gear icon in the upper right of the page and select Recurring transactions under Lists. A table containing all of the ones you’ve created will open. There are multiple columns in this table that provide a lot of information about each transaction. They are Template Name, Type, Txn (Transaction) Type, Interval, Previous Date, Next Date, Customer/Vendor, and Amount.

● The final column, Action, lists the options you have for each type of recurring transaction. For Unscheduled Invoices, you’ll most likely Use them, though you can also Edit them. If you set up a transaction as a Reminder, you can do the following to it:
● Edit (edit the template, not the transaction)
● Use (opens the original transaction that you can edit, save, and send)
● Duplicate (duplicate the template)
● Pause (stop sending reminders temporarily)
● Skip next date
● Delete

Your time as a business owner is valuable. Don’t waste any of it doing duplicate data entry. Creating recurring transactions in QuickBooks Online is one way of minimizing keystrokes and using the time savings to manage other elements of your business. If you have any questions about what we discussed here or are struggling with any other features in QuickBooks Online, don’t hesitate to contact us to schedule an appointment.

Filed Under: Quickbooks

How to Set Up a Bookkeeping Cycle in QuickBooks Online

June 13, 2025 by admin

Event planner timetable agenda plan on year 2024 schedule event. Business woman checking planner on mobile phone, taking note on calendar desk on office table. Calendar event plan, work planningDo you have a regular schedule you follow with your QuickBooks Online work? It can be a good strategy.

Bookkeeping is cyclical. You tend to do the same things over and over, which may get to be a bit of a drag for you. QuickBooks Online can automate some processes, and it certainly helps minimize duplicate data entry, but you’ll undoubtedly find yourself growing weary of repetitive tasks.

We can’t help you avoid this drudgery completely, but we’d like to suggest a new, more organized way to attack your accounting tasks in 2025. It could be especially helpful if you’re a new QuickBooks Online user and don’t have a routine established yet. But even long-time users might find this routine helpful. It can keep things from slipping through the cracks and simply make you more productive and confident that you’re addressing all of your accounting issues.

Give it a try and see what you think.

What Should You Do Every Day?

Even if you don’t have expenses to enter or invoices to process, it’s a good idea to log into QuickBooks Online every day. If you’ve connected your online bank and credit cards to the site (which you absolutely should), there will probably be transactions to go over. So after you’ve taken a look at your Dashboard (especially your Tasks), hover your mouse over Transactions in the toolbar and click Bank transactions.

Click Update in the upper right to make sure you’re seeing the most recent transactions. If you’re doing this every day, it shouldn’t take long to go over the income and expenses that have been imported since you last logged in.

You should be looking at newly imported transactions daily and completing the fields provided as comprehensively as possible.

If you don’t know what Match or Record as transfer mean, we should schedule a session to go over transaction management in QuickBooks Online.

Every Week

You need to be monitoring your accounts receivable and payables on a weekly basis – at minimum. There are two ways to do this. You can:

Run reports.

• Click Reports in the toolbar and scroll down first to Who owes you. Run Accounts receivable aging summary. QuickBooks will display past-due transactions in several columns (Current, 1-30 days, 31-60 days, 61-90 days, and 91 and over). If you’re keeping up with your receivables, you shouldn’t be seeing numbers in most of the columns, unless you’re in a known collections process.

• Scroll down to What you owe and run Accounts payable aging summary. This works like the aging receivables report. Again, you shouldn’t be seeing much activity here unless you’re in a payment dispute with a vendor.

• You can also run the Open Invoices report to quickly see the Due date and Open balance entries here. Ditto the Unpaid Bills report.

Consult the All sales page.

Hover your mouse over Sales in the toolbar and click All sales. The colored bars and numbers at the top of the page show you the status of your sales. Click the orange bar in the middle to see a list of overdue invoices. If there are any, you can set a Send reminder by clicking the corresponding down arrow in the Action column. While you’re there, look at estimates and unbilled income and take any action needed.

Every Two Weeks (or more often, depending on product volume)

If you sell products and track inventory in QuickBooks Online, you should keep a close eye on your stock to see if you need to:

• Reorder,

• Bring in a larger supply because something is selling well, or,

• Discount or discontinue a product because it’s not selling.

Click Reports in the toolbar and run Product/Service List under Sales and customers and look at the Quantity on hand column.

Every Month

Reconcile your accounts (Transactions | Reconcile).

It’s really, really important that you reconcile your accounts every month. We can help you with this.

No one likes to do this, but it’s way easier to do regular reconciliations than it is to have to go back several months to track down a problem. If you’ve never done this in QuickBooks Online, it works similarly to how you used to reconcile your accounts by comparing a bank statement and your paper checkbook register. Only you’re comparing your bank or credit card statements to your accounts in QuickBooks Online. Before you start, make sure you’ve matched and categorized all of your downloaded transactions.

Run a Profit and Loss report for the last month.

Click Reports in the toolbar and click Profit and Loss under Business overview. Did you make a profit last month?

Every Quarter

If you’re planning to apply for a loan or looking for an investor, or if you just want a deeper understanding of how your business is doing, consider having us create and analyze standard financial reports for you, like the Balance Sheet and Statement of Cash Flows. You can run these yourself in QuickBooks Online, but it really takes an accountant’s eye to understand and interpret them.

If you decide that you want to work with us in any capacity, like helping you with reconciliation and/or modifying your Chart of Accounts, there’s another way we can help. If you ever have trouble categorizing an expense, select Uncategorized Expenses as the Category. If we’re meeting with you once a month, we can run a report on these and help you categorize them correctly.

Filed Under: Quickbooks

Is Your Favorite Pastime Turning Into a Small Business? The IRS Wants to Know.

February 11, 2025 by admin

Young serious man looking at laptop. Man learning new hobby, knitting on needles. Knitting project in progress. - ImageIf you’re making $400 or more on your hobby, it’s time to start declaring it on your income taxes.

We take on hobbies because we enjoy them. But at some point, we sometimes get enough people wanting the woven towels or the birdhouses or the Christmas ornaments we make that it’s time to start charging for them. Supplies cost money, and your time is certainly worth something.

A lot of people get started that way. Before you know it, they’ve set up a shop on Etsy and started exhibiting at craft shows. At what point does this become a business, they may ask themselves.

If you’re bringing in $400 or more per year on your side gig, you should know that there are two good reasons why you should be reporting your business on your Form 1040:
• You’ll be able to deduct at least some of your expenses, and,
• The IRS mandates it.

8 Questions

When your hobby becomes a small business, you’ll have to complete and file a Schedule C with your 1040.

If your personal enterprise has turned a profit in three of the last five years, it’s quite likely that your creative endeavors have become something that requires a Schedule C along with your 1040. The IRS suggests that you ask yourself eight questions to help determine whether it considers you a business and not a hobby. They go something like this:

1.   Does the time and effort you put into the activity show you intend to make a profit?

2.   Does the activity make a profit in some years, and if so, how much profit does it make?

3.   Can you expect to make a future profit from the appreciation of the assets used in the activity?

4.   Do you depend on income from the activity for (at least part of) your livelihood?

5.   Are any losses due to circumstances beyond your control or are the losses normal for the startup phase of your type of business?

6.   Do you change your methods of operation to improve profitability?

7.   Do you carry out the activity in a businesslike manner and keep complete and accurate books and records?

8.   Do you and any advisors you might work with have the knowledge needed to carry out the activity as a successful business?

How Will You Report Your Income?

Depending on how much money you make and where/how you sell your products, you may receive a 1099 of some sort. If you accept credit cards, it will most likely be the 1099-K: Payment Card and Third-Party Network Transactions. If you take checks and cash, you’ll have to add it all up yourself. Keep any documentation you have if this is the case. You’ll report this on your Schedule C.

How Will You Know If An Expense Is Deductible?

Some business expenses are obvious. If you’re making birdhouses, for example, everything you buy to assemble them should be considered part of your Cost of Goods Sold. If you’re buying products wholesale and reselling them, that should be deductible, too.

But there’s a lot of gray area. The IRS says that legitimate business expenses are those that are “ordinary and necessary.” An ordinary expense is one that is typical and widely accepted in your industry. A necessary expense, on the other hand, is one that is useful and appropriate for your business operations. An expense doesn’t need to be essential to qualify as necessary.

Some small business owners really stretch the interpretation of “ordinary and necessary.” There’s a famous case where a company that had a warehouse tried to deduct the cost of cat food. The contents of the warehouse were attracting rodents and snakes, and they wanted to feed stray cats who would keep the population of unwanted visitors down. The IRS accepted it as a legitimate business expense.

Our point here is not that you should try to find some outlandish business expenses to deduct. But we want you to really think about what it costs you to do business. If you’re ever audited, you’ll have to make a case to the IRS about why you claimed a particular purchase as necessary for your business. Keep meticulous records of your purchases.

On to a New Year

Keep these things in mind as we move into a new year – and tax preparation season. You may want to consider reclassifying your hobby as a business and filing a Schedule C with your 1040. We’re not IRS auditors, of course, so we can’t tell you whether a certain purchase will be considered a deductible business expense. But we can help you deal with the tax-related issues you’ll face should you decide it’s time for you to start claiming income and expenses for your pastime-turned-business.

Filed Under: Quickbooks

Too Many Transactions in QuickBooks Online? Create Rules

April 21, 2022 by admin

Confident young man at his deskIt’s important to categorize transactions, but it takes time. If every day brings several dozen into QuickBooks Online, you can automate this process.


One of the cardinal rules of accounting is this: Go through your new transactions every day. If you wait until there are too many of them, you’re likely to give them short shrift. You may miss problems, just as you might skip categorizing some of them because it simply takes too long.

But correct categorization is essential. Your income taxes and reports will not be accurate if you fail to assign the right category to all of your transactions. QuickBooks Online makes this easy.

The site also provides a way for you to accelerate the process by automating it. It allows you to create Rules. That is, if a transaction contains a specific piece of information, a name or an amount, QuickBooks Online allows you to indicate how it should be categorized. This kind of automation will save you time and may even prevent errors – as long as you use it carefully. Here’s how it works.

Defining Your Rules

We’ll use an easy example to explain how QuickBooks Online’s Rules work. Let’s say your shipping costs have started to increase lately, and you want to make sure you’re seeing any UPS transactions that go above a specified dollar amount, and that they’re categorized accurately. Hover your mouse over Transactions in the toolbar and click on Banking (assuming you’re downloading your bank transactions). Select an account to work with by clicking on it, and make sure the For review bar is highlighted.

Click on a transaction to open it. (If you’ve never explored what you can do with a downloaded transaction, study this box carefully while you’re there, and contact us with any questions.) On the bottom line, you’ll see a link labeled. Create a rule. Click on it, and a panel slides out from the right, as pictured below:

Quickbooks tips

The upper half of the Create rule panel

This portion of the Create rule panel is fairly self-explanatory. Give your rule a descriptive name (we entered UPS 25 Plus) and indicate whether it should be applied to Money in or Money out. If you want to select a specific bank account or card, click the down arrow in the field to the right and select it. Otherwise, choose All bank accounts. Next, decide whether a transaction has to meet Any of the conditions you’re going to specify or All of them. In this case, we want All.

Now you have to describe the conditions under which a transaction will be affected. We want transactions whose Description Contains The UPS Store. We also want to identify purchases from The UPS Store whose total is more than $25. So you’d click + Add a condition. In the row that opens, click the down arrow in the Description field and select Amount. Click the down arrow again in the next field and choose Is greater than. The final field in the row should contain 25.00.

You could keep adding conditions, but that’s all we need for this rule. You can click Test rule if you want to find out how many transactions in your For review list would meet your specifications.

Next, you want to Assign attributes to the transactions selected. Your options here are Transaction type, Category, Payee, Tags, Class, and Memo. The first two are required and the third is recommended. The last three are optional. If you want QuickBooks Online to automatically confirm transactions this rule applies to, click the Auto-confirm button so it’s showing green. If you choose this option, your matching transactions will be modified to meet your criteria and moved directly into the Categorized queue. You won’t see them in For review. So consider this carefully.

When you’re done here, click Save.

Quickbooks tips

The lower half of the Create rule screen

Warning: QuickBooks Online allows you to create new categories directly from this window. But accurate categorization is so critical that we’d rather you schedule a session with us to go over your list of categories and make any modifications necessary.

To recap: Any expense over $25 that comes into your For review queue whose Description reads will be automatically categorized and moved into the Categorized queue.

QuickBooks Online’s Rules can save you time, but if they’re not created correctly, you may have errors in your company file without even knowing it. We recommend that you let us help you set these up from the start to avoid this. If you’re new to downloading transactions onto the site, you may also want to consult with us.

Filed Under: Quickbooks

Start 2022 Off Right: Clean Up QuickBooks

January 19, 2022 by admin

quickbooks tips computerIs Your QuickBooks company file ready for 2022? Three things you can do to put things in order.
January is always such a transitional month. You’re trying to wrap up everything that didn’t get done during a hectic December. At the same time, you have to jump into the new year and start doing your regularly-scheduled work. It can be hard to tell sometimes which year you’re working on.

Don’t forget about QuickBooks while you’re catching up on 2021 and looking ahead to 2022. You probably don’t want to put one more item on your to-do list, but any steps you take now to ready the software for the new year will pay off. Once you start entering transactions and placing orders and welcoming new customers, it will help tremendously to have a clean slate.

Here are some suggestions for completing as much of the work you started in 2021 as you can.

Run four critical reports

Bills can slip through without being paid in December because there’s so much going on. This applies to both you and your customers. You need to catch up on what’s owed to you and what you owe. So generate these four reports in QuickBooks:

  • A/R Aging Detail. Which of your customers are in arrears with their payments to you? How much do they owe you, and when should the money have come in?
  • Open Invoices. Which invoices have not yet been paid? There will be some duplication with A/R Aging Detail, but this report isolates only unpaid transactions.
  • A/P Aging Detail. Are you caught up with the money you owe other individuals and companies? This report will tell you.
  • Unpaid Bill Details. Like Open Invoices, this report sets apart only the bills that have unpaid balances.

Create statements for past-due customers

quickbooks desktop tips

One collection method you can use in QuickBooks if you don’t want to communicate directly with overdue customers is to send statements.

You’ll have to decide how hard you want to lean on customers who are late paying your bills when it’s so early in the year. Certainly, if some customers are more than 60 days late (30 days if they have sizable balances), you may want to make a phone call or at least send a personalized email asking them to fulfill their obligations.

But you can also send statements. These documents provide details of financial activity between you and your customers for a given period of time. Open the Customers menu and click Create Statements. Look over all of the options in the window that opens and indicate your preferences. If customers don’t respond to your statements within 10 days, then it may be time for a phone call.

Take a hard look at your inventory

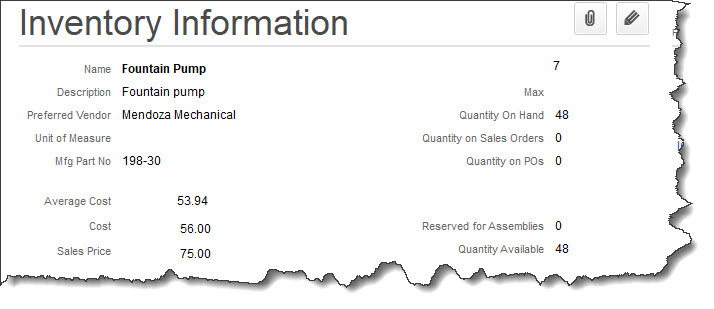
It may have been a while since you did this, but it’s really important to do it regularly – especially if you had a busy holiday season. The best way to start on this is to open the Vendors menu, scroll down and hover over Vendor Activities, and click Inventory Center.

If you don’t have a lot of inventory, you could just highlight each entry under Active Inventory, Assembly over to the left. The window that opens on the right side of the screen holds an enormous amount of detail about each item. But if you sell a lot of different kinds of items, that will take too much time. In that case, you might run one or more of the reports linked from this screen. Even the QuickReport can be helpful.

quickbooks desktop tips

You can get a lot of information about individual items you sell in QuickBooks’ Inventory Center.

Tip: If you need to adjust the quantity you have on hand, click the down arrow next to Manage Transactions in the lower left and select Adjust Quantity/Value on Hand. You might consult with us if you’re running into this problem, and we can go over inventory issues with you.

Set Up Online Financial Connections

January is also a good time to be thinking about how you can better use QuickBooks in 2022. We tend to learn how to use the tools we need and not explore any further when we’re using any kind of software. QuickBooks is such a massive program that that’s understandable.

But there are two tools that can have tremendous impact on your daily workflow, your ability to get paid faster by customers, and your understanding of where you stand financially every day. They are:

  • Online Banking. Did you know that you can connect QuickBooks to many financial institutions and import your cleared transactions every day? That’s what the Bank Feeds Center is all about. If you sign up for this service, you won’t have to wait until your monthly statement comes to see what transactions have gone through.
  • Online Payments. If you’re only accepting checks as payment from your customers, you’re probably getting paid more slowly than you might. Sign up for QuickBooks Desktop Payments, and you’ll be able to process credit cards, eChecks, and ACH payments.

We know you’re busy catching up from the holiday breaks right now. But if you need our help with anything we discussed in this month’s column, please reach out to us. We’re always available to set up a consultation.

Filed Under: Quickbooks

  • Page 1
  • Page 2
  • Next Page »

Primary Sidebar

Search

Archives

  • November 2025
  • October 2025
  • September 2025
  • August 2025
  • July 2025
  • June 2025
  • May 2025
  • April 2025
  • March 2025
  • February 2025
  • January 2025
  • December 2024
  • November 2024
  • October 2024
  • September 2024
  • August 2024
  • July 2024
  • June 2024
  • May 2024
  • April 2024
  • March 2024
  • February 2024
  • January 2024
  • December 2023
  • November 2023
  • October 2023
  • September 2023
  • August 2023
  • July 2023
  • June 2023
  • March 2023
  • February 2023
  • January 2023
  • December 2022
  • November 2022
  • October 2022
  • September 2022
  • August 2022
  • July 2022
  • June 2022
  • May 2022
  • April 2022
  • March 2022
  • February 2022
  • January 2022
  • December 2021
  • November 2021
  • October 2021
  • September 2021
  • August 2021
  • July 2021
  • June 2021
  • May 2021
  • April 2021
  • March 2021
  • February 2021
  • January 2021
  • December 2020
  • November 2020
  • October 2020
  • September 2020
  • August 2020
  • July 2020
  • June 2020
  • May 2020
  • April 2020
  • March 2020

Categories

  • Best Business Practices
  • Business Tax
  • Estate and Trusts
  • Individual Tax
  • Investment
  • Quickbooks
  • Real Estate
  • Retirement
  • Uncategorized

Copyright © 2022 · https://www.rhl1040.com/blog